Category Archives: Wordpress

Store uploaded file URL in custom field

I had to tweak the code here a little to get the desired result. For some reason, wp_get_attachment_url() method wasn’t returning the correct values. My version of the code is given below for reference:

add_filter( 'frm_new_post', 'create_a_custom_field', 10, 2 );
function create_a_custom_field( $post, $args ) {
$field_id = 89; //replace 89 with the correct field id
if ( isset( $_POST['item_meta'][ $field_id ] ) && !empty( $_POST['item_meta'][ $field_id ] ) ) {
$field_value = sanitize_text_field( $_POST['item_meta'][ $field_id ] );
$attachmentids = '';
foreach ($_POST['item_meta'][ $field_id ] as $value) {
$attachmentids=$attachmentids.','.$value;
}
$post['post_custom']['_product_image_gallery'] = $attachmentids;
}
return $post;
}

Hope this helps! Please let me know if there is a better way to achieve the same results.

Formidable integration with intercom.io

Intercom is a CRM platform that acts as the single channel between client and service provider. The tool can be used to manage, communicate and tag users in addition to a variety of other features.

My requirement was to tag intercom users once a formidable entry is marked as approved. The idea is to identify the logged in WP user and tag the corresponding user entry in intercom. Key pieces to the integration are given below:
1) A view with single field edit links.
2) Once the the entry is updated, based on certain conditions, send data to intercom and tag users.
3) Intercom API documentation can be found here.
4) Intercom’s PHP library and installation instructions are in Github here.

Code snippet
require_once 'intercom/vendor/autoload.php';
use Intercom\IntercomBasicAuthClient;
add_action('frm_after_update_field', 'frm_trigger_entry_update'); //action triggered during entry update from view
function frm_trigger_entry_update($atts){
$entry = FrmEntry::getOne($atts['entry_id']);
do_action('frm_after_update_entry', $entry->id, $entry->form_id); //callback to FP frm_after_update_entry hook
}
add_action('frm_after_update_entry', 'send_to_intercom', 10, 2); //action triggered after update entry
function send_to_intercom($entry_id, $form_id){
$intercom = IntercomBasicAuthClient::factory(array( //intercom initialization
'app_id' => 'app_id',
'api_key' => 'app_key'
));
global $wpdb,$frm_entry,$frm_entry_meta;
//replace 28, 342, 285, 341 with your form and field ids respectively
if($form_id == 28 && FrmEntryMeta::get_entry_meta_by_field($entry_id, 342) == 'Approved') {
$tag_user = new WP_User( FrmEntryMeta::get_entry_meta_by_field($entry_id, 285) );
$intercom->tagUsers(array( //call to 'tagUsers' intercom api function
"name" => FrmEntryMeta::get_entry_meta_by_field($entry_id, 341).": Approved",
"users" => array(
array("email" => $tag_user->user_email)
)
));
}
}
}

Hope this helps! Please feel free to share your experiences and let me know if there are better ways to use the intercom API.
Stripe Connect Payment processing

In this post, I am going to talk about how to implement Stripe Connect to accept payments on behalf of a seller.

Essentially, my requirement was to:
1) Design a form with metadata fields like Name, Currency, Amount with a Pay button at the end.
2) Add field validations to the form.
3) Once the form is completed and “Pay” button clicked, invoke Stripe Checkout to process the payment and show the appropriate payment success/failure message.
4) Formidable Pro acted as the backend end database and it’s API was used for some server side validations.

The form design (part 1) was achieved by using plugin WP Simple Pay Pro and it’s shortcodes. The shortcodes were placed inside Formidable HTML type fields to have better control on the form design and use some aspects of FP API for server side validation.

The custom form validations (Part 2) were implemented using Parsley. The library is included as part of Simple Pay Pro and doesn’t require to be installed separately.

We implemented a custom Stripe Pay button (part 3) using Stripe Checkout API.

On a high level, the technical process flow is as follows:
a) The click on the “Pay” button in the form validates the form fields using Parsley JS library ($form.parsley().validate()).
b) Once the form passes validation, the Stripe payment overlay is invoked using handler.open({}) function.
c) Once the overlay form is completed and submitted, the resulting token is captured and processed by the StripeCheckout.configure({}) function.
d) Based on payment success/failure, custom message is displayed on a form designed on Formidable.

Hope this overview helps! Please don’t hesitate to contact me for any question on implementation details or if you have better suggestions.

Search for repeating sections in Formidable Pro

One of the pain areas while working with repeating sections in Formidable Pro is that the fields contained in repeatable sections are not searchable.

Unable to search for certain fields in a form really defeats the purpose of including such fields in the first place. Formidable team is going to roll out a fix in the next release, but there is a workaround to fix it locally unless the next version of FP is made available.

Please note that the changes suggested here are to the core FP source and kindly ensure to take a back-up of entire FP source code. The steps are given below:

1. Go into formidable/pro/classes/helpers/FrmProAppHelper.php. Near line 448, you’ll see this:
$new_ids = FrmEntryMeta::getEntryIds( $where_statement, '', '', true, $filter_args );
Right above it, add this:
$filter_args['return_parent_id'] = ( $where_field->form_id != $args['form_id'] );

2. Next, go into formidable/classes/models/FrmEntryMeta.php. Near line 293, you’ll see this:
$query[] = $unique ? 'DISTINCT(it.item_id)' : 'it.item_id';
Replace it with this:
$defaults = array( 'return_parent_id' => false );
$args = array_merge( $defaults, $args );
if ( $args['return_parent_id'] ) {
$query[] = $unique ? 'DISTINCT(e.parent_item_id)' : 'e.parent_item_id';
} else {
$query[] = $unique ? 'DISTINCT(it.item_id)' : 'it.item_id';
}

This should fix the search issue with fields in repeatable sections. Hope this helps! Please let me know if there is a better solution to the same problem.

UltimateClientManager plugin

Riding on my proof of concept and research, I built v1.0 of my plugin for UCM.

My requirement is to build a plugin to manage Leads for different clients. There are options to add and modify leads. Currently, the plugin is being scaled so that Leads can flow back and forth between different systems. Technically, this will involve integration (Read/Write) to Formidable Pro as all the leads also sync to Formidable database as part of a separate solution.

Please let me know if you have questions and I will try to address individual queries. I shall be writing more on this subject once integration with Formidable Pro is complete.

Formidable entry creation date

Quick tip to fetch entry creation date with Formidable API.
global $frm_entry,$frm_entry_meta;
$entries = $frm_entry->getAll("form_id=50"); //replace 50 with your form id
foreach($entries as $entry){
echo $entry->created_at; //entry creation date generally in format('Y-m-d H:i:s')
}

Hope this helps! Please share your experience and tips or tricks while working with FP.

Customize WooCommerce Points and Rewards

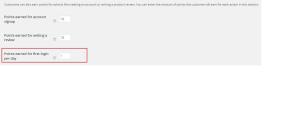
WooCommerce Points and Rewards is a fantastic extension from WC team that lets us setup reward points for customers. By default, it can be configured for users to earn points for certain actions like “account signup” & “writing a review”. My requirement was to add another action called “Points earned for first login per day”. I will share the code along with relevant comments and screenshots to showcase the implementation.
Add the below filters and actions in functions.php file of your WP theme (Child themes recommended).
Ref: API Docs for WC Points and Rewards
//Filter to add the option of points for login per day
add_filter( 'wc_points_rewards_action_settings', 'points_rewards_for_login_per_day' );
function points_rewards_for_login_per_day( $settings ) {
$settings[] = array(
'title' => __( 'Points earned for first login per day' ),
'desc_tip' => __( 'Enter the amount of points earned when a customer logs in for the first time each day.' ),
'id' => 'wc_points_rewards_login_per_day',
);
return $settings;
}
//Filter to add events description for Points Log tab
add_filter( 'wc_points_rewards_event_description', 'points_rewards_for_login_per_day_event_description', 10, 3 );
function points_rewards_for_login_per_day_event_description( $event_description, $event_type, $event ) {
$points_label = get_option( 'wc_points_rewards_points_label' );
switch ( $event_type ) {
case 'wc-add-points-login-per-day': $event_description = sprintf( __( '%s earned for first login of the day' ), $points_label );
break;
}
return $event_description;
}
//Action to capture the log in event. My requirement is to register the first log in of the day
function func_on_login($user_login, $user) {
$points = get_option( 'wc_points_rewards_login_per_day' ); //get points configured during rewards setup in admin
$lastlogindatetime = get_user_meta( $user->ID, 'last_login_time', true ); //I am persisting the value of first log in of the day in a user meta variable
if ( $lastlogindatetime != '' && (date( 'Y-m-d', time() ) != date( 'Y-m-d', $lastlogindatetime )) ) {
if ( ! empty( $points ) ) {
WC_Points_Rewards_Manager::increase_points( $user->ID, $points, 'wc-add-points-login-per-day' );
}
update_user_meta( $user->ID, 'last_login_time', time() );
} else if ($lastlogindatetime == '') {
if ( ! empty( $points ) ) {
WC_Points_Rewards_Manager::increase_points( $user->ID, $points, 'wc-add-points-login-per-day' ); //increase point on first log in of the day
}
add_user_meta( $user->ID, 'last_login_time', time() );
}
}
add_action('wp_login', 'func_on_login', 10, 2);

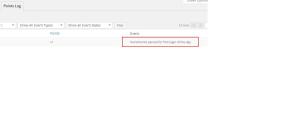
Also attached are two screenshots corresponding to the first two filters, one for action settings and the other for Points Log tab. The results are highlighted in boxes.WC Action settingsWC Points Log tab
Hope this helps! Please feel free to share your experiences with WooCommerce customization and if there is a better way to achieve the same results as described in this post.

Autocomplete in Formidable Pro

Formidable Pro offers a fine feature called ‘enable autocomplete‘ for drop-down fields, the team making an extremely intelligent and efficient use of Chosen to drive this new field option.
However, one demerit of this feature is the lack of mobile support, ‘overkill’ being cited as one of the reasons for desktop only support and I respect their decision and whoever voted in favor of the cause.
This made me decide to implement my own custom solution with plain old jQuery and a text field (instead of drop-down). My requirement is to drive a ‘Data From Entries‘ field with ‘enable autocomplete’ checked for users to look up the values as they type. Also, users should be able to submit the data even if they enter a value not present in the drop-down, the new value finally getting added to the drop-down list.
As a first step to solve the problem, I added a text field to the form and bounded it to jQuery autocomplete. Second step was to write some PHP to make it the remote data source for autocomplete script. I used Formidable API to collect and return all field values from the form that was supposed to be the source for my data from entries field. This made my text field behave as a drop-down and also enabled users to add new values to the list. On form submission, I used Formidable hook to add the new entry to the list of entries.
A small demo is attached, the values you see are Formidable entries. Hope this helps! Please leave me a comment and let me know if there is a better way to achieve the same result.

Secure Page behind WP log in

Steps to quickly secure a page behind WordPress login are:
1) Open the page template you are using to display the page in text editor.
2) Add the code block below just beneath the template name
<?php if(is_user_logged_in()){ //check if user is logged in ?>
3) Go to the end of the template and add the below code
<?php } else { wp_redirect(wp_login_url(get_permalink())); //Redirect to login page} ?>
That’s it. Your page is now secured behind a login. Hope this helps! Please leave a comment and let me know if there is a better way to achieve the same result.